
It is a terrifying rite of passage for almost every Linux system administrator.
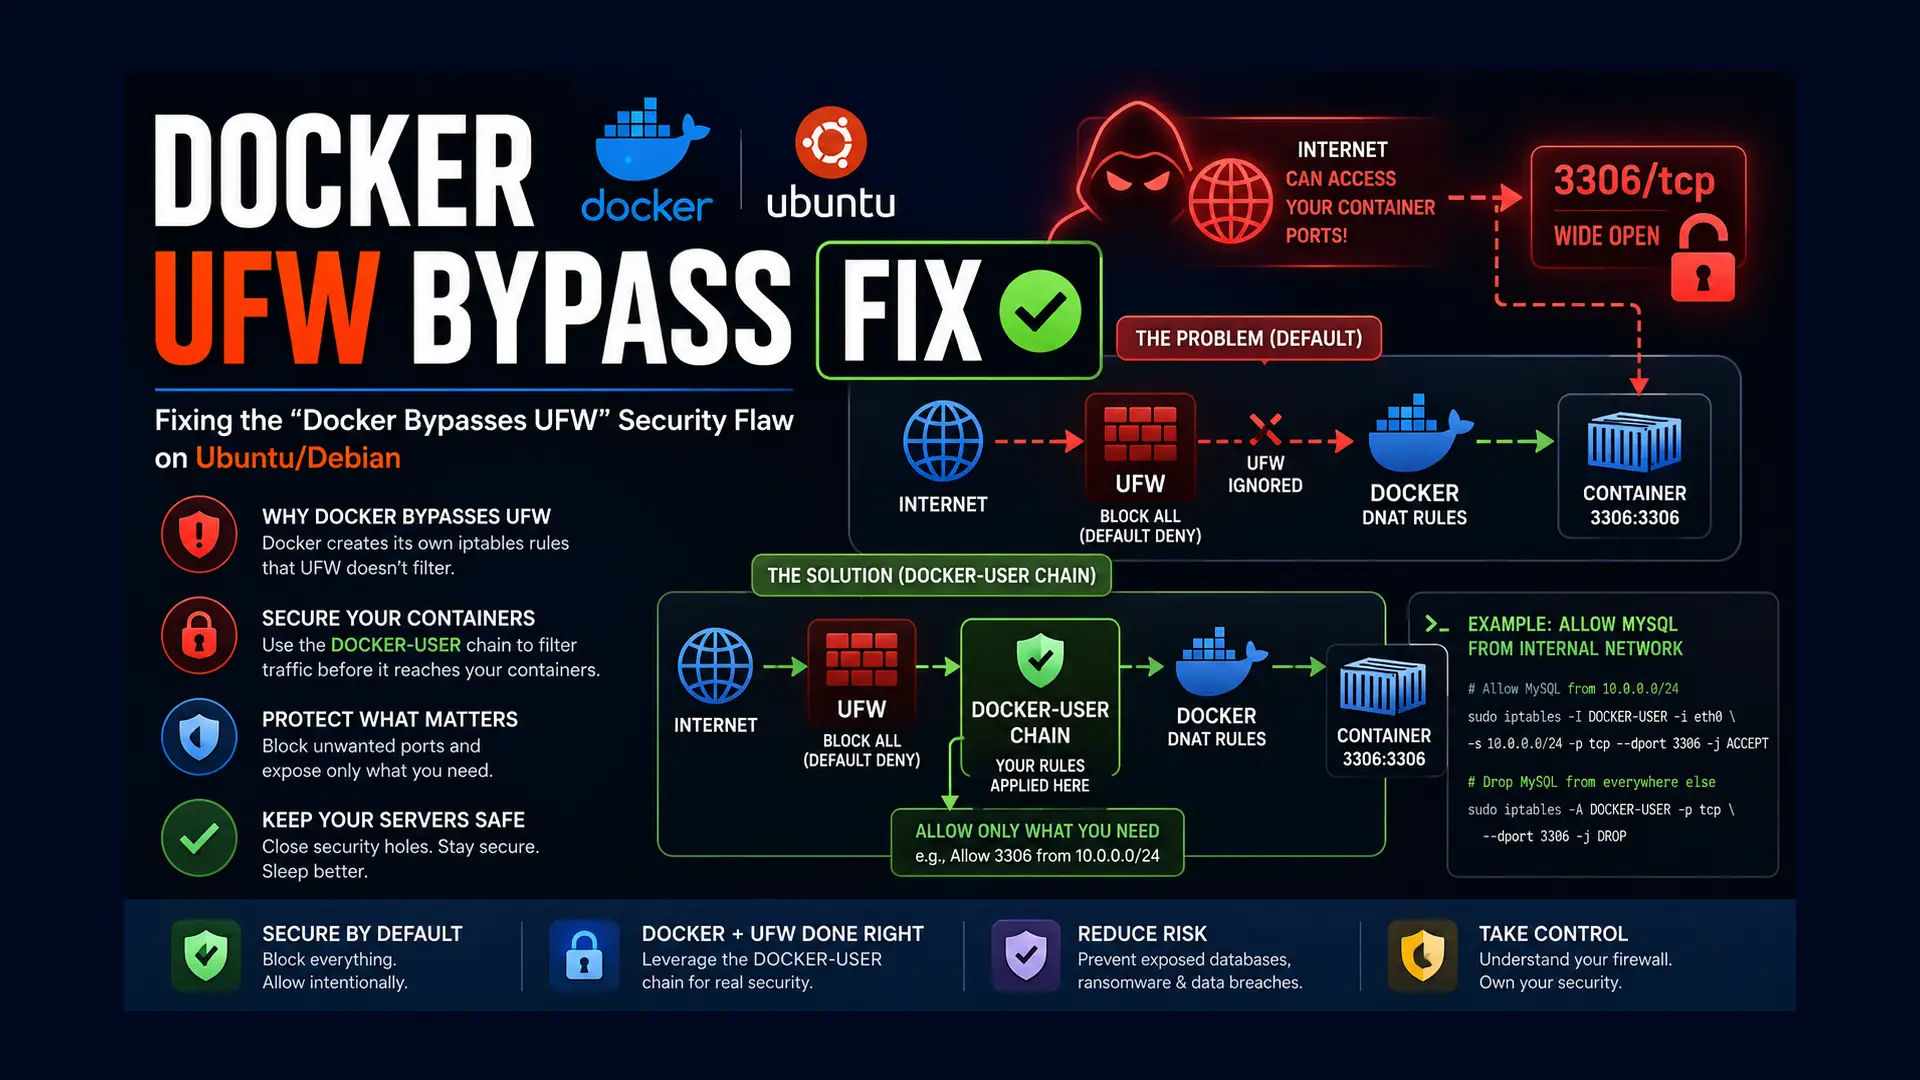
You provision a brand new Ubuntu or Debian dedicated server. You responsibly configure the Uncomplicated Firewall (UFW) to block all incoming traffic by default. You meticulously open only ports 80, 443, and 22. Feeling secure, you spin up a Dockerized MySQL database, mapping the port with -p 3306:3306 so your local applications can access it.
A week later, you run a port scan on your server's public IP address, only to discover that port 3306 is wide open to the entire internet. UFW is completely ignoring your Docker containers.
This is not a bug; it is an architectural design choice. However, if left unaddressed, it is a massive security vulnerability that routinely leads to compromised databases, ransomware attacks, and cryptojacking.
What You'll Learn
Why Does Docker Bypass UFW? (The Architecture)
The "Bad" Fixes You Should Avoid
The Definitive Solution: The DOCKER-USER Chain
Step 2: Reload UFW
Step 3: Verify the Fix
How to Safely Allow External Access
Conclusion
Why Does Docker Bypass UFW? (The Architecture)
To understand the fix, you must understand the underlying mechanics of Linux networking. UFW is not a firewall itself; it is a user-friendly frontend for iptables (or nftables), the actual firewall built into the Linux kernel. When you type ufw allow 80/tcp, UFW translates that into a complex set of iptables rules.
The Linux Packet Flow
When a packet of data hits your server's network interface, it travels through several internal "chains" before reaching an application.
-
PREROUTING (NAT Table): The packet arrives here first. This is where Network Address Translation (NAT) occurs.
-
Routing Decision: The kernel decides if the packet is meant for the host machine itself or if it needs to be forwarded elsewhere.
-
INPUT (Filter Table): If the packet is meant for the host machine, it goes here. This is where UFW places its "Drop all by default" rules.
-
FORWARD (Filter Table): If the packet is meant for another network namespace (like a Docker container), it goes here instead of the INPUT chain.
The Docker Override
When you start the Docker daemon, it requires deep control over your network to isolate containers and route traffic to them. When you publish a port using -p 3306:3306, Docker automatically injects rules directly into the PREROUTING chain.
Because PREROUTING happens before the routing decision, Docker intercepts the packet, sees that it is destined for port 3306, translates the destination IP to the container's internal IP (e.g., 172.17.0.2), and sends it to the FORWARD chain.
The packet completely bypasses the INPUT chain. UFW never even sees the packet, which is why your "default deny" rule is entirely ignored.
The "Bad" Fixes You Should Avoid
If you search the internet for a solution to this problem, you will inevitably encounter two highly recommended—but fundamentally flawed—fixes.
Bad Fix 1: Disabling Docker's iptables Access
Many tutorials suggest opening /etc/docker/daemon.json and adding "iptables": false.
Why you shouldn't do this: By revoking Docker's permission to edit iptables, you successfully stop it from bypassing UFW. However, you also completely break Docker's internal networking. Your containers will no longer be able to resolve external DNS, communicate with other containers across custom bridge networks, or access the outside internet (because outbound masquerading is disabled). You are trading a security flaw for a broken infrastructure.
Incomplete Fix 2: Binding to Localhost
Another common suggestion is to only bind ports to the local loopback address: docker run -p 127.0.0.1:3306:3306.
Why this is incomplete: This is actually a fantastic security practice if your container only needs to be accessed by a local application (like an Nginx reverse proxy running on the same host). However, it is not a solution if you genuinely need external access to the container (e.g., allowing your office IP to access a Dockerized staging environment) and want UFW to manage that access.
The Definitive Solution: The DOCKER-USER Chain
Docker recognized this conflict with system administrators and introduced a dedicated iptables chain called DOCKER-USER.
When Docker injects its routing rules into the FORWARD chain, it always places the DOCKER-USER chain at the very top. Any rules placed in DOCKER-USER are evaluated before Docker's automatic port forwarding takes effect.
By configuring UFW to inject specific blocking rules into the DOCKER-USER chain, we can force Docker to respect our firewall boundaries without breaking internal container networking.
Step 1: Modifying UFW's after.rules
UFW allows administrators to add custom iptables rules that run after UFW's standard configuration. We will add our DOCKER-USER logic here.
Log into your Ubuntu/Debian server via SSH as root or a sudo user.
Open the UFW
after.rulesfile in your preferred text editor:
sudo nano /etc/ufw/after.rulesScroll to the very bottom of the file. You must add the following block of code at the end of the file. Do not place it inside existing
*filterblocks.
# BEGIN UFW AND DOCKER INTEGRATION
*filter
:DOCKER-USER - [0:0]
:ufw-user-forward - [0:0]

# 1. Allow containers to communicate with each other on the internal network
-A DOCKER-USER -j RETURN -i docker0
-A DOCKER-USER -j RETURN -i br-+

# 2. Allow established and related connections (Return traffic)
-A DOCKER-USER -j RETURN -m conntrack --ctstate RELATED,ESTABLISHED

# 3. Allow internal traffic from the host to the containers
-A DOCKER-USER -j RETURN -i lo

# 4. Forward the traffic to UFW's user-forward chain for custom route rules
-A DOCKER-USER -j ufw-user-forward

# 5. Block all other external traffic attempting to reach Docker containers
-A DOCKER-USER -j DROP -p tcp -m tcp --tcp-flags FIN,SYN,RST,ACK SYN -d 192.168.0.0/16
-A DOCKER-USER -j DROP -p tcp -m tcp --tcp-flags FIN,SYN,RST,ACK SYN -d 10.0.0.0/8
-A DOCKER-USER -j DROP -p tcp -m tcp --tcp-flags FIN,SYN,RST,ACK SYN -d 172.16.0.0/12
-A DOCKER-USER -j DROP -p udp -m udp --dport 0:32767 -d 192.168.0.0/16
-A DOCKER-USER -j DROP -p udp -m udp --dport 0:32767 -d 10.0.0.0/8
-A DOCKER-USER -j DROP -p udp -m udp --dport 0:32767 -d 172.16.0.0/12

# 6. Return control to Docker for allowed traffic
-A DOCKER-USER -j RETURN
COMMIT
# END UFW AND DOCKER INTEGRATION
Save the file and exit the editor (Ctrl+O, Enter, Ctrl+X in nano).
Understanding the Code Block
Instead of blindly copy-pasting, it is critical to understand what these rules are doing to your server:
-
Section 1: Tells the firewall to ignore traffic happening inside the Docker bridge networks. This ensures your containers can still talk to each other.
-
Section 2 & 3: Ensures that if a container initiates a request to the internet (e.g., downloading an update), the response is allowed back in. It also allows the host OS to talk to the containers.
-
Section 4: This is a crucial hook. It routes traffic through
ufw-user-forward. This allows you to use standard ufw route allow commands later to selectively open ports. -
Section 5: The core defense. It explicitly drops any new, external connection attempts (SYN packets) that are trying to reach the private IP subnets (192.168.x.x, 10.x.x.x, 172.16.x.x) that Docker assigns to its containers.
Step 2: Reload UFW
For the new rules to take effect, you must reload the UFW service.
sudo ufw reloadYou should see the output: Firewall reloaded.
Step 3: Verify the Fix
It is vital to verify that the vulnerability is closed. Spin up a test container, publishing a port to all interfaces (0.0.0.0):
docker run -d --name nginx-test -p 8080:80 nginxFrom a different computer (like your local laptop), attempt to connect to that port using curl or telnet:
curl -I http://YOUR_SERVER_PUBLIC_IP:8080The connection should hang or time out. UFW is now successfully blocking the traffic before Docker can route it. You can now safely remove the test container: docker rm -f nginx-test.
How to Safely Allow External Access
Now that your Docker containers are completely locked down behind UFW, how do you expose a port when you actually want the public to access it?
Because standard ufw allow commands only apply to the INPUT chain, they will no longer work for Docker containers. Instead, you must use UFW Route Rules. This instructs UFW to apply the allow rule to the FORWARD chain, seamlessly interacting with the DOCKER-USER hook we created.
Scenario A: Exposing a port to the entire internet
If you are running a public web server in a container and want to open port 8080 to the world, use this command:
sudo ufw route allow proto tcp from any to any port 8080Scenario B: Restricting a port to a specific IP address
If you are running a database container (port 3306) and only want your office IP address (203.0.113.50) to access it, use this command:
sudo ufw route allow proto tcp from 203.0.113.50 to any port 3306Scenario C: Restricting access to a specific container
Docker dynamic IP assignments can be tricky, but if you have a container with a static internal IP (e.g., 172.17.0.5), you can restrict traffic so that it is only allowed to route to that specific container's IP on a specific port:
sudo ufw route allow proto tcp from any to 172.17.0.5 port 80To remove any of these route rules later, simply prefix the command with delete:
sudo ufw route delete allow proto tcp from any to any port 8080Conclusion
The interaction between Docker and UFW is one of the most dangerous blind spots for Linux system administrators. Because Docker manipulates the iptables NAT table to function, it inherently bypasses the filter chains where standard firewalls operate.
By modifying your /etc/ufw/after.rules to utilize the DOCKER-USER chain, you reclaim control of your network perimeter. You secure your exposed databases and internal services without sacrificing the robust, automated networking that makes Docker so powerful. Always remember: when orchestrating Dockerized infrastructure, never assume a port is closed until you have explicitly verified it from an external network.