
For years, Linux administrators operated under the assumption that ransomware was exclusively a Windows problem. That era is over. Today, sophisticated ransomware gangs actively target Linux dedicated servers, specifically hunting for database dumps, web directories, and most importantly, your local backups.
When an attacker gains root access, their first move is to find your /backups directory and either encrypt the .tar.gz files or execute a devastating rm -rf. If your backups are stored locally without specialized protection, they will be destroyed, leaving you with no option but to pay the ransom or lose your business.
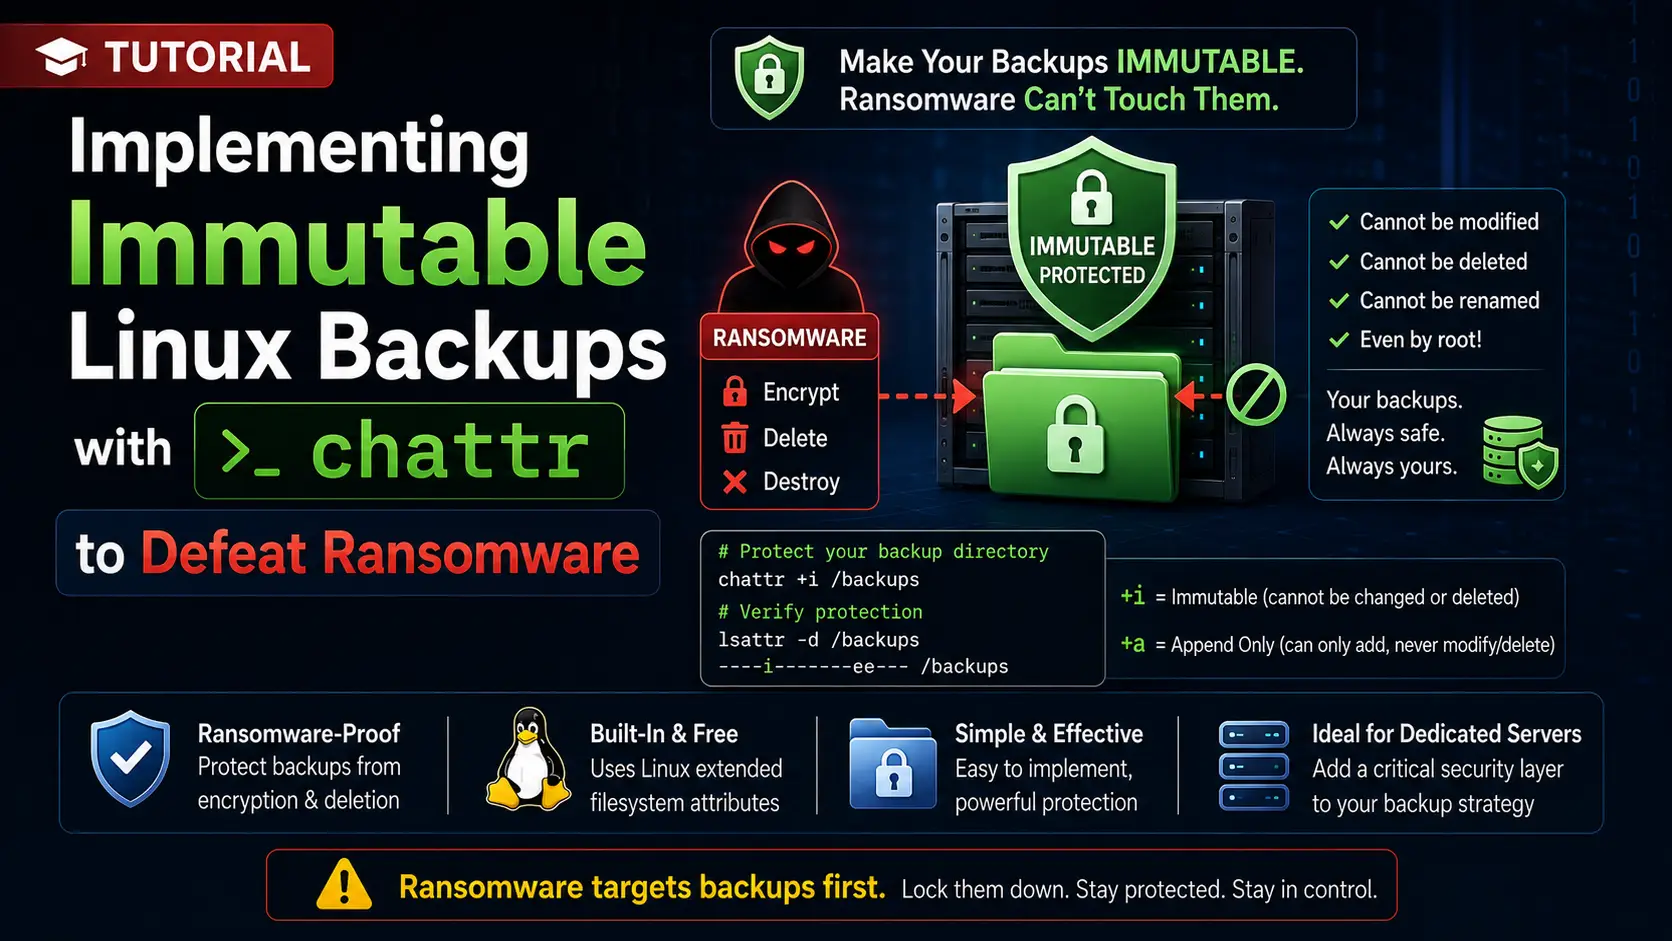
In the enterprise world, the buzzword solution to this is "Immutable Storage"—backups that cannot be altered, encrypted, or deleted by anyone, even the system administrator, for a set period. While enterprise cloud vendors charge a premium for this feature, you can achieve a highly effective layer of immutability on your bare-metal Linux server for absolutely free using a built-in filesystem utility: chattr.
In this comprehensive tutorial, we will explore how to use Linux extended filesystem attributes to construct ransomware-proof backup directories.
What You'll Learn
The Flaw in Standard Permissions
Understanding Linux File Attributes (chattr)
Step 1: Setting up the Secure Backup Directory
Step 2: The Append-Only Strategy (+a) for Logs
Step 3: The Immutable Strategy (+i) for Archives
Step 4: Automating Immutable Backups with Cron
Step 5: Protecting the Backup Script Itself
Advanced Protection: Dropping Capabilities
The Flaw in Standard Permissions
Most system administrators believe their backups are secure because they have set strict standard permissions. You might have a backup script running as a dedicated backupuser and permissions locked down to 400 (read-only):
chmod 400 /backups/db_dump.sql
chown backupuser:backupuser /backups/db_dump.sql
The Vulnerability: Standard POSIX permissions (rwx) are evaluated by the Linux kernel. If a threat actor escalates their privileges to root, the kernel bypasses all POSIX permission checks. The root user can simply run rm -f /backups/db_dump.sql or chmod 777 on the file and then encrypt it.
Standard permissions protect you from unauthorized standard users, but they offer zero defense against a compromised root account or a privilege-escalation exploit.
Understanding Linux File Attributes (chattr)
To defeat a compromised root account, we must move our defense deeper than the user-permission level. We must apply restrictions at the filesystem level.
Modern Linux filesystems (Ext2/3/4, XFS, btrfs) support Extended File Attributes. These attributes instruct the filesystem driver itself on how a file can be handled. The tool used to change these attributes is chattr (Change Attribute), and the tool used to view them is lsattr (List Attribute).
There are two attributes highly relevant to ransomware defense:
1. The Immutable Attribute (+i)
When a file is marked with +i, it becomes entirely immutable.
It cannot be deleted.
It cannot be renamed.
No link (hard or soft) can be created to it.
No data can be written to it.
Even the root user cannot delete a file with the +i attribute. If root tries to run rm -rf, the filesystem will return a "Operation not permitted" error. The only way to delete the file is for root to explicitly run chattr -i to remove the attribute first.
Why this defeats ransomware: Most automated ransomware scripts are designed for speed. They recursively crawl directories, encrypt files, and delete the originals. They are rarely programmed to check for extended filesystem attributes and run chattr -i before encrypting. When the ransomware hits your immutable backup, it will fail, and your archive will survive.
2. The Append-Only Attribute (+a)
When a file is marked with +a, it can only be opened in "append" mode.
It cannot be deleted.
It cannot be renamed.
Existing data within the file cannot be overwritten or modified.
New data can only be added to the very end of the file.
This is exceptionally useful for backup logs or continuous stream dumps where you need to continuously add data, but want to ensure an attacker cannot wipe the history.
Step 1: Setting up the Secure Backup Directory
Let's begin by preparing a dedicated directory for our backups. Create the backup directory on an Ext4 or XFS partition:
sudo mkdir -p /protected_backups
Secure the base permissions to ensure standard users cannot peek at the contents:
sudo chown root:root /protected_backups
sudo chmod 700 /protected_backups
-
Note:
chattrcommands will fail if you try to run them on tmpfs (RAM disks) or network mounts like NFS/SMB unless the remote server explicitly supports and translates the attributes. Always perform this on local block storage.
Step 2: The Append-Only Strategy (+a) for Logs and Streams
Let's look at how the append-only attribute functions. This is perfect for securing your system logs or an ongoing backup log so an attacker cannot cover their tracks by wiping it.
Create a log file:
sudo touch /protected_backups/backup.log
Apply the append-only attribute using chattr +a:
sudo chattr +a /protected_backups/backup.log
Verify the attribute using lsattr:
lsattr /protected_backups/backup.log
Output should look like: -----a--------e--- /protected_backups/backup.log
Testing the Protection
Try to overwrite the file (simulating ransomware corrupting data):
sudo bash -c 'echo "Ransomware Encrypted Data" > /protected_backups/backup.log'
Result: bash: /protected_backups/backup.log: Operation not permitted
Try to append to the file (legitimate behavior):
sudo bash -c 'echo "Backup completed successfully" >> /protected_backups/backup.log'
Result: Success. The new line is added, but the old data remains completely safe.
Step 3: The Immutable Strategy (+i) for Static Archives
For your actual backup archives (like a compressed /var/www/ tarball or a MySQL .sql dump), you want absolute immutability.
Create a simulated database backup file:
sudo bash -c 'echo "SELECT * FROM users;" > /protected_backups/db_monday.sql'
Apply the immutable attribute using chattr +i:
sudo chattr +i /protected_backups/db_monday.sql
Verify the attribute:
lsattr /protected_backups/db_monday.sql
Output should look like: ----i---------e--- /protected_backups/db_monday.sql
Testing the Protection
Attempt to delete the file as the root user:
sudo rm -f /protected_backups/db_monday.sql
Result: rm: cannot remove '/protected_backups/db_monday.sql': Operation not permitted
Try to rename or move the file (another common ransomware tactic):
sudo mv /protected_backups/db_monday.sql /protected_backups/db_monday.sql.encrypted
Result: mv: cannot move '/protected_backups/db_monday.sql' to '/protected_backups/db_monday.sql.encrypted': Operation not permitted
The file is effectively bulletproof against any script that doesn't explicitly know to unlock it first.
Step 4: Automating Immutable Backups with Cron
Manually typing chattr +i after every backup is not scalable. We need to automate this process. The logic is simple:
The script unlocks the backup directory (if applying attributes to a rotating filename).
The script generates the new backup archive.
The script immediately applies the immutable attribute to the new archive.
Here is a robust, production-ready Bash script (/opt/secure_backup.sh) that dumps a MySQL database, compresses it, and instantly locks it down.
#!/bin/bash
# /opt/secure_backup.sh

BACKUP_DIR="/protected_backups"
DATE=$(date +%Y-%m-%d)
FILENAME="db_backup_${DATE}.sql.gz"
FULL_PATH="${BACKUP_DIR}/${FILENAME}"

# 1. Execute the backup (replace with your actual backup command)
echo "Starting database dump..."
mysqldump -u root my_database | gzip > "${FULL_PATH}"

# 2. Verify the backup was created successfully
if [ -f "${FULL_PATH}" ]; then
    echo "Backup created successfully. Applying immutable lock..."

    # 3. Apply the immutable attribute
    chattr +i "${FULL_PATH}"

    # 4. Verify the lock
    if lsattr "${FULL_PATH}" | grep -q "\-i\-"; then
        echo "SUCCESS: ${FILENAME} is now locked and immutable."
    else
        echo "WARNING: Failed to apply immutable attribute!"
    fi
else
    echo "ERROR: Backup file was not generated."
fi
Handling Backup Rotation
If you run this script every day, your disk will eventually fill up because you cannot delete the old, locked backups! You must build rotation logic into your script.
To delete a backup older than 7 days, your script must briefly unlock it before executing rm:
# Find backups older than 7 days, unlock them, and delete them
find /protected_backups/ -name "db_backup_*.sql.gz" -mtime +7 -exec chattr -i {} \; -exec rm -f {} \;
Step 5: Protecting the Backup Script Itself
If an attacker gains root access, they might discover your /opt/secure_backup.sh script. If they edit your script to say rm -rf / instead of doing a backup, the next time cron runs, it will destroy your server.
You must make the backup script and your cron configuration immutable as well!
Lock the backup script:
sudo chattr +i /opt/secure_backup.sh
Lock your cron spool or crontab file:
sudo chattr +i /var/spool/cron/root
-
Note: If you ever need to add a new cronjob, you will need to run
chattr -i /var/spool/cron/rootfirst, edit the cronjob, and then re-lock it.
Advanced Protection: Dropping Capabilities
A highly sophisticated, human-operated ransomware attack might manually discover that your files are locked via chattr and simply run chattr -i to unlock them before encrypting.
While rare, you can completely eliminate this risk by using Linux Kernel Capabilities.
The chattr command relies on a specific kernel capability called CAP_LINUX_IMMUTABLE. If you drop this capability from the running system, not even the root user can run chattr.
You can drop this capability using tools like capsh or by configuring systemd services to run without it. Alternatively, for extreme security, you can compile your kernel or use tools like lcap to remove CAP_LINUX_IMMUTABLE from the system entirely.
If you drop this capability, the only way to unlock the files is to reboot the server into single-user mode or a live rescue environment. This makes your local backups functionally identical to enterprise "air-gapped" WORM (Write Once, Read Many) drives. An attacker who breaches your server over the network cannot delete your backups, no matter how much access they have.
Summary
In the age of automated ransomware, standard POSIX file permissions (chmod / chown) provide zero protection once an attacker escalates their privileges.
By integrating chattr +i and chattr +a into your daily backup bash scripts, you create a hardware-level trap that standard ransomware cannot penetrate. While true enterprise protection involves off-site, air-gapped backups, adding an immutable lock to your local bare-metal archives is a completely free, highly effective insurance policy that takes less than five minutes to configure.